This checklist is built from real agency experience managing redesigns for businesses ranging from independent service providers to multi-location brands. It covers every phase of the process in the sequence it needs to happen — not as an overview, but as an operational document you can actually work from.
One honest number before we get into it: many small businesses lose 30–60% of their organic traffic after a redesign because they focus on design but ignore search performance. This guide exists to make sure that doesn’t happen to you.
Before You Touch Anything: The Strategic Foundation
The most expensive mistakes in website redesigns happen before a single pixel is moved. They happen in the strategy phase — or more accurately, in the absence of one.
The most expensive mistake is redesigning because “it’s time” without defining what the new site should accomplish. Every redesign should start with measurable goals. Otherwise you’re spending thousands on a prettier version of the same problems.
Here’s the strategic groundwork that has to happen first.
✅ Phase 1: Strategy and Goal Setting
Define your commercial objectives with specificity. “Better website” is not an objective. “Increase inbound lead form submissions by 30% within 90 days of launch” is. Every decision made during the redesign — information architecture, content structure, CTA placement, page speed targets — should be evaluated against your defined commercial objectives.
Identify the primary problems with your current site. 61.5% of website redesign projects are undertaken to fix user experience issues — but the issue driving the redesign isn’t always the one causing the most commercial damage. Run a proper diagnosis before you decide what to fix. Is your conversion rate low because your value proposition is unclear? Because your contact form is buried? Because you’re attracting the wrong traffic in the first place? The answer determines what the redesign needs to solve.
Define your target audience for 2026, not 2020. Buyer behaviour shifts. If your last site was built more than three years ago, the way your ideal customers find, evaluate, and decide to contact you has likely changed. Document your current buyer journey, including the role AI search tools play in how prospects discover you.
Set measurable KPIs before launch. Establish baseline metrics now — organic traffic, conversion rate, average session duration, bounce rate, Core Web Vitals scores — so you have something concrete to measure against post-launch.
Document your current site’s best performers. Before changing anything, crawl your site with Screaming Frog or SEMrush. Export every URL, its current organic traffic, backlinks pointing to it, and ranking keywords. This is your asset map. The pages generating real commercial value need to be protected, not accidentally deleted during the redesign.
Full SEO and Content Audit
This is the phase most redesign projects either skip entirely or execute too late. Do it before design begins.
Crawl your entire existing site. Use Screaming Frog, SEMrush, or Ahrefs to crawl every URL on your current site. Export the complete list with status codes, title tags, meta descriptions, H1s, word counts, and inbound link counts. You need this before touching anything.
Identify your top-performing pages by organic traffic. Pull 12 months of data from Google Analytics and Google Search Console. Which pages drive the most organic visits? Which pages generate the most conversions? These are your SEO assets. Losing them during the redesign isn’t a minor setback — it’s potentially losing pages that have taken years to build authority.
Map every high-value URL to its new destination. Many owners delete old blog posts to clean up the site, but they often remove pages that drive 15% of their total leads. You need a data-driven audit to identify your SEO superstars before you touch the delete key.
Document all existing backlinks. Export your backlink profile from Ahrefs or SEMrush. The URLs that have the most external links pointing to them carry the most SEO authority — and that authority needs to be preserved or properly redirected.
Identify content gaps alongside content strengths. Your audit should flag what’s working (keep and improve it) and what isn’t (candidate for consolidation, deletion, or complete rewrite). Thin content that isn’t ranking for anything valuable and generating no conversions is weighing down your site. This is the moment to address it.
Assess your current technical SEO health. Before designing a new site, you need to know the state of your existing one: broken links, crawl errors, duplicate content issues, missing meta tags, slow pages. Don’t carry these into the new build.
✅ Phase 3: User Research and Competitor Analysis
Talk to actual customers before writing a brief. 91% of dissatisfied users leave a website without providing feedback, which means your analytics data alone will never tell you why people aren’t converting. Run five to eight user interviews with existing customers to understand how they found you, what made them decide to enquire, and what almost stopped them. This is worth more than any heatmap.
Analyse your top three to five competitors’ websites. Not to copy them — to identify the gaps you can exploit. What are they doing well in their messaging? What questions does their content leave unanswered? Where do they have conversion friction that you can eliminate on your new site? Competitor analysis at this stage shapes information architecture and content strategy in ways that are impossible to retrofit later.
Review your analytics for user behaviour data. Session recordings (Hotjar, Microsoft Clarity), heatmaps, and funnel drop-off reports tell you where users are getting stuck on your current site. These behavioural signals should directly inform navigation decisions, CTA placement, and page structure on the new site.
The Design Phase: Structure Before Aesthetics
Here’s a principle we hold firmly in agency work: information architecture before visual design. The temptation — especially when you’re excited about what a new site could look like — is to jump straight to visual concepts. Resist it.
✅ Phase 4: Information Architecture and Wireframing
Build your new site map from user needs, not organisational logic. Most company websites are structured the way the business thinks about itself. The best-performing websites are structured the way customers think about their problems. These are rarely the same thing.
Create user flows for your primary conversion paths. If the goal of your site is to generate enquiries, map every step between a first-time visitor landing on your homepage and successfully submitting an enquiry form. Then ask: at each step, what could go wrong? What information does the user need that isn’t yet available? What friction can be removed?
Wireframe before designing. Wireframes — simple, unstyled layouts that show the structural logic of each page — are the most cost-effective investment in any redesign. They let you evaluate whether the content architecture is sound before anyone has spent time on visual design. Changes at wireframe stage cost an hour. Changes at development stage cost a week.
Plan your mobile experience first, not second. More than 70% of small business traffic comes from mobile. Designing desktop-first and then adapting for mobile consistently produces worse mobile experiences than starting with mobile constraints and expanding outward. Establish your mobile UX as the primary design before building out the desktop layout.
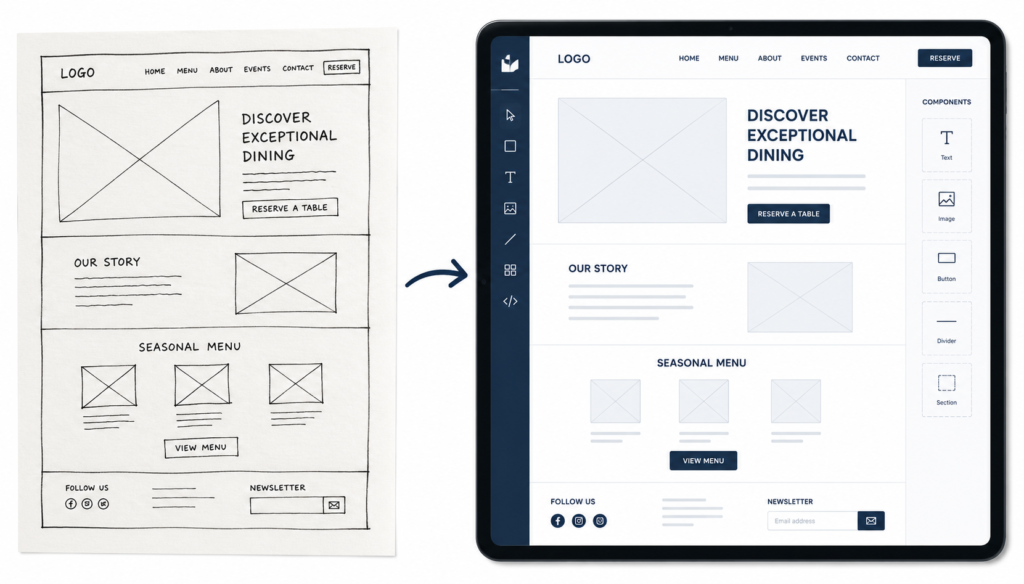
✅ Phase 5: Visual Design and Brand Consistency
Establish a design system, not just a set of pages. A design system — defined typography, colour palette, spacing rules, button styles, component library — ensures your site looks and feels consistent across every page. It also dramatically speeds up development and makes future updates cheaper and faster.
Prioritise clarity over creativity. It takes just 50 milliseconds for users to form an opinion about your site, and 94% of those first impressions are based on design. That first impression needs to communicate what you do, who it’s for, and why they should trust you — immediately. Visual complexity that sacrifices clarity for aesthetics will hurt your conversion rate.
Test every design element against your conversion goals. CTAs placed above the fold are 73% more visible, whereas visibility drops to 44% when placed below the fold. Every design decision — where the primary CTA appears, how navigation is structured, what goes in the hero section — should be evaluated against whether it helps the user take the desired action.
Get professional photography and video created before development finishes. Nothing undermines a well-designed website faster than placeholder images, stock photography that doesn’t match the brand, or low-resolution photos of your actual product or team. Commission photography and video as part of the redesign budget, not as an afterthought.
The Build Phase: Technical Excellence Is Not Optional
This is where a lot of business owners disengage — “that’s the developer’s job.” But the decisions made in this phase directly affect your search rankings, your user experience, and your ability to be found by AI search tools. Understanding what should be happening is essential.
✅ Phase 6: Technical SEO During Development
Maintain URL structure wherever possible. One of the most common and avoidable mistakes is confusing permanent 301 redirects with temporary 302 redirects. Before changing any URL, ask whether the change is necessary. If a URL is ranking well and driving traffic, leaving it unchanged is almost always the right call.
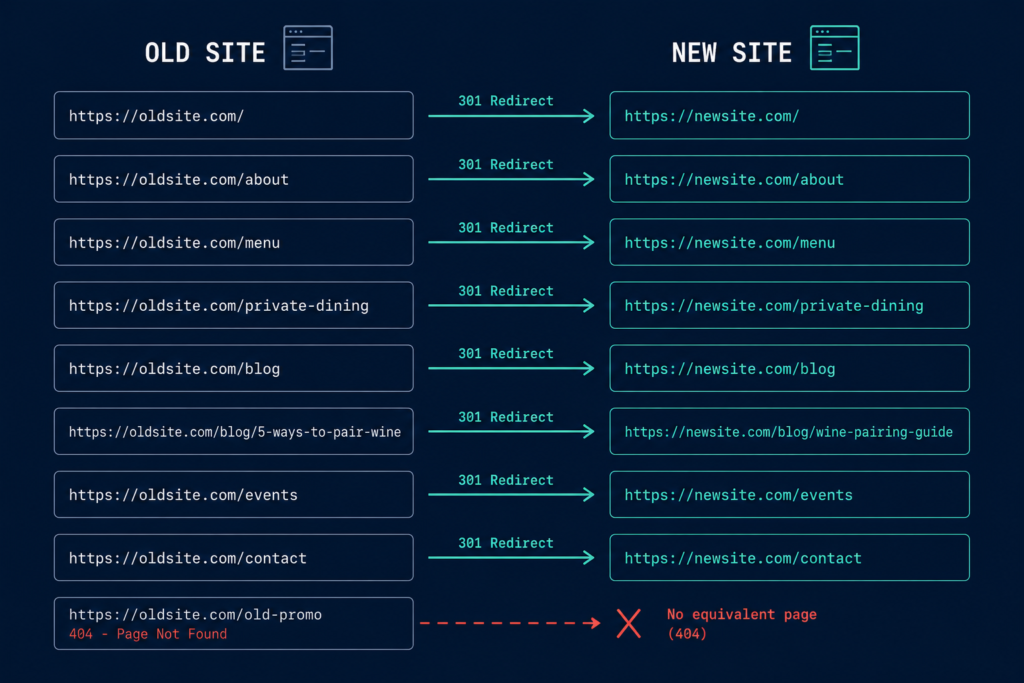
Build a comprehensive 301 redirect map. For every URL that must change, create a direct 1:1 redirect to its new equivalent. A 301 redirect is the permanent digital forwarding address for your SEO authority. Without this map, search engines land on 404 errors and stop trusting your domain; this effectively kills the value of every backlink you’ve ever earned.
Do not redirect old pages to your homepage. Do not create redirect chains (A→B→C). Each old URL needs a direct, permanent redirect to its most relevant new destination.
Block your staging environment from search engines. Your new site will live on a staging or development URL while it’s being built. If this isn’t blocked from Google’s crawlers with a robots.txt disallow or password protection, you risk duplicate content penalties before you even launch.
Transfer all metadata, not just content. Title tags, meta descriptions, H1s, and image alt text need to be migrated from the old site or written fresh for the new one. They routinely get lost in CMS migrations. Before launch, compare every important page’s metadata against the old site export.
Implement schema markup at the build stage. The architectural requirements for WCAG 2.2 compliance are now virtually indistinguishable from the structural prerequisites of modern search algorithms and Large Language Models. Schema markup — Article, FAQ, HowTo, LocalBusiness, Service, BreadcrumbList — helps both search engines and AI tools understand your content with precision. Implement it during development, not as a post-launch retrofit.
Build internal linking deliberately. Your site’s internal link structure tells search engines which pages are most important and how content relates to each other. Don’t leave this to chance or default template behaviour. Map your primary pillar pages and ensure they receive internal links from relevant supporting content.
✅ Phase 7: Performance Optimisation
Speed is not a nice-to-have. It’s a ranking signal, a conversion driver, and increasingly, a signal used by AI tools to assess content quality.
Google reports that 53% of mobile visitors abandon if a page takes more than 3 seconds to load. HubSpot observes a +103% bounce rate with an extra 2 seconds of load time.
Target Google’s Core Web Vitals benchmarks:
- Largest Contentful Paint (LCP): under 2.5 seconds
- Interaction to Next Paint (INP): under 200 milliseconds
- Cumulative Layout Shift (CLS): below 0.1
These aren’t aspirational targets — they’re the thresholds Google uses in its ranking algorithm. A visually stunning site that misses these benchmarks will be demoted in search results regardless of how good the content is.
Optimise every image before it goes live. Oversized, uncompressed images are the single most common cause of slow page loads. Use WebP format, compress to the minimum acceptable quality, set explicit width and height attributes to prevent layout shift, and implement lazy loading for images below the fold.
Minimise render-blocking scripts and CSS. Every unnecessary plugin, third-party script, and CSS file that loads before the page renders adds to your load time. Audit everything being loaded and remove or defer anything that isn’t essential to the initial user experience.
Use a Content Delivery Network (CDN). For any site with visitors across different geographic regions, a CDN serves content from servers geographically closer to the visitor, dramatically reducing load times. This is a development-level decision, not a design one.
Test on real mobile devices, not just browser simulations. Browser-based mobile simulations don’t accurately represent real device performance. Test your staging site on actual phones — including older, lower-spec models — before launch.
✅ Phase 8: Accessibility
Accessibility isn’t a legal box to tick — though with accessibility legislation expanding across the UK, EU, and US, that dimension is increasingly significant too. It’s also now functionally identical to the structural requirements that help AI systems parse and cite your content.
Meet WCAG 2.2 AA as your minimum standard. This covers colour contrast ratios, keyboard navigation, screen reader compatibility, alt text on all meaningful images, and form labelling. WCAG compliance is cheaper to build in than to retrofit.
Use semantic HTML throughout. Proper heading hierarchy (H1, H2, H3 in logical sequence), semantic page structure elements, and descriptive link text aren’t just good practice for screen readers — they’re how search engines and AI tools understand the structure and hierarchy of your content.
Test with actual accessibility tools. Run your staging site through WAVE and Axe before launch. These tools surface accessibility errors that aren’t visible in normal browser testing and that often correspond directly to crawlability issues.
✅ Phase 9: GEO Optimisation — Structuring for AI Search Visibility
Web design in 2026 is about building websites that are easier to understand, faster to trust, easier to use, and to surface in both search engines and AI-generated answers.
This is the layer of the redesign that most agencies aren’t yet systematically building in — and where early movers are building genuine competitive advantages.
Structure content around direct answers, not keyword-stuffed paragraphs. AI tools cite content that answers specific questions clearly and concisely. Rewrite service pages and key content pages to answer the primary question a user would ask in the first 100 words, then expand. Question-based H2 and H3 headings make content significantly more citable.
Add FAQ sections with schema markup to all major pages. Format content in Q&A, comparison, and how-to structures. FAQPage schema explicitly signals to AI systems that this content is question-and-answer format — one of the most commonly cited content structures in AI-generated responses.
Include author schema and last-updated dates on all content. AI favours content with transparent ownership and freshness. Every blog and service page should include author schema and a last-updated date. This is a direct EEAT signal — it tells both Google and AI models that real, accountable people created and maintain this content.
Ensure consistent entity information across your site. Your business name, address, phone number, areas served, and core service descriptions should be consistent and clearly structured across your site, your Google Business Profile, and your third-party directory listings. This consistency builds the entity confidence that AI tools use when deciding whether to reference a business.
Write brand descriptions that AI can quote. How does your site describe what you do? If it’s vague, jargon-heavy, or requires significant inference to understand, AI tools will struggle to accurately represent you in generated responses. Write a clear, specific, factual one-paragraph description of your business and what it does — and make sure it appears prominently on your homepage and About page.
Pre-Launch: The Checklist That Prevents Catastrophe
Everything up to this point has been build-phase work. This phase happens before you flip the switch.
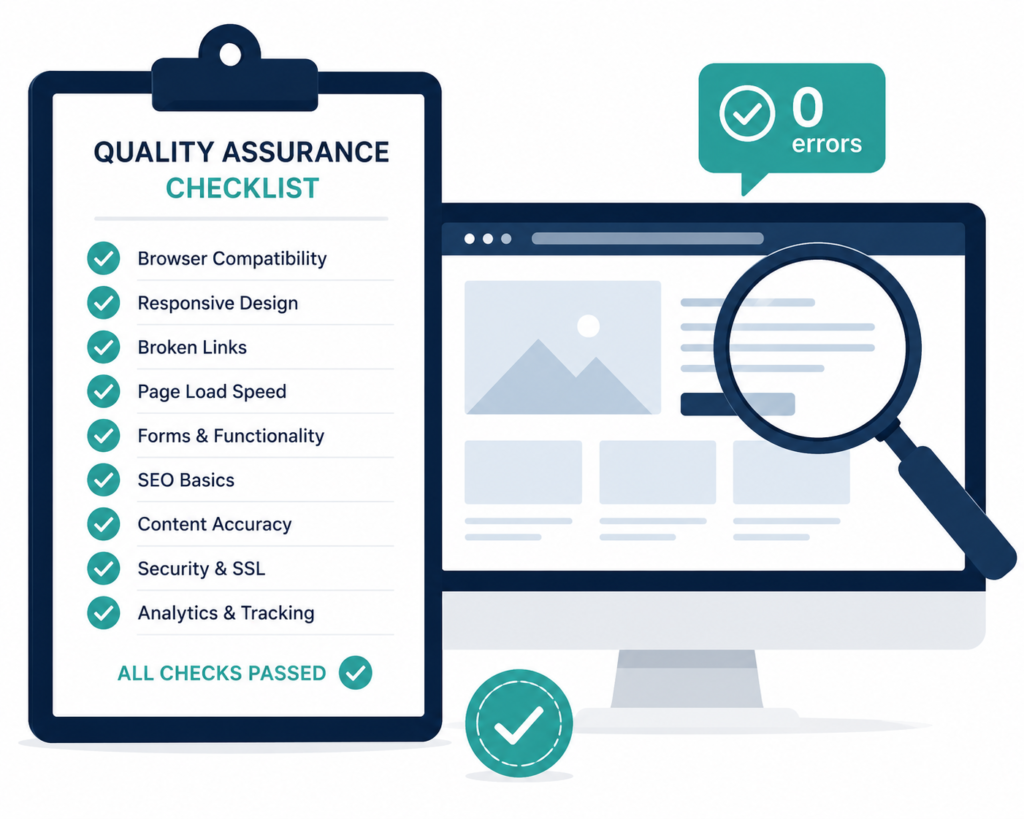
✅ Phase 10: Pre-Launch Technical Checks
301 redirect testing — every single URL. Test every redirect in your mapping document. Confirm each old URL routes correctly to its intended new destination. Check for redirect chains, redirect loops, and any URLs that return 404. Do this on the staging environment before launch.
Crawl the staging site. Run Screaming Frog on your staging domain (with the crawler user-agent allowed). Compare the output against your old site crawl. Every page that exists on the old site should either exist on the new site or have a confirmed redirect. No exceptions.
Verify all tracking is in place. Google Analytics 4, Google Tag Manager, any conversion tracking pixels, CRM integrations, form submission tracking — confirm every tracking mechanism is live on the staging environment before launch. Re-check again after launch. Analytics or sitemap updates forgotten — the site launches, traffic looks strange, and it turns out the tracking wasn’t connected.
Test all forms and conversion paths. Submit every form on the site. Verify submissions arrive where they’re supposed to. Confirm email notifications fire correctly. Check that any CRM or email platform integrations record the submission. Test on mobile and desktop.
Run a full cross-browser and cross-device test. Test in Chrome, Safari, Firefox, and Edge. Test on iPhone, Android, tablet, and desktop. Check at least three different screen sizes. Look for layout breaks, slow-loading elements, and anything that doesn’t behave as expected.
Confirm SSL certification. Your new site must load via HTTPS. Verify the SSL certificate is correctly installed and that HTTP requests automatically redirect to HTTPS.
Check robots.txt and XML sitemap. Ensure the staging environment’s robots.txt disallow rules are removed before launch. Generate a fresh XML sitemap for the new site. Confirm the sitemap URL is referenced in robots.txt.
Verify no staging URLs have leaked into the new site. Check that no internal links, images, or scripts are still pointing to the staging domain. These create broken resources or unwanted cross-domain references that affect performance and indexing.
✅ Phase 11: Analytics Configuration
Set up GA4 with conversion events before launch. Not after. The first week of traffic data after a major site launch is some of the most valuable data you’ll ever collect — you need to capture it properly from day one.
Configure Google Search Console for the new domain. If your URL structure has changed significantly, verify the new site in Search Console. Submit your new XML sitemap. Set up crawl monitoring so you can see any indexing errors within days of launch.
Set up custom alerts for traffic anomalies. Post-launch traffic drops are common, brief, and normal in many cases. But a 40% organic traffic drop that persists for more than two weeks is a signal that something is wrong — and you need to know immediately, not when you review monthly reports. Set up automated alerts in GA4 or SEMrush.
Create a post-launch monitoring dashboard. Track these metrics weekly for the first three months after launch: organic traffic vs. pre-launch baseline, keyword rankings for your top 20 terms, crawl errors in Search Console, Core Web Vitals scores, conversion rate by key landing page, and bounce rate by traffic source.
Post-Launch: The Work That Determines Whether the Investment Pays Off
Most businesses treat launch day as the finish line. It’s actually the starting gun.
✅ Phase 12: Launch Week Actions
Submit updated sitemaps to Google and Bing. Log into Google Search Console and Bing Webmaster Tools. Submit your new XML sitemap. Request indexing for your highest-priority pages.
Notify Google of significant changes. Use the URL Inspection tool in Search Console to request indexing on your homepage and top 10 most commercially important pages. Google will find them through crawling, but a direct request speeds up the process.
Monitor for 404 errors daily for the first two weeks. Check Search Console’s Coverage report and your site’s server logs for 404 errors. Every new 404 you catch and redirect is traffic and authority that would otherwise be lost.
Re-crawl the live site within 48 hours of launch. Run Screaming Frog on the live domain. Compare against your pre-launch crawl. Flag any unexpected changes — pages missing, redirects behaving differently than planned, metadata that didn’t transfer correctly.
Brief your team on the new site. Your sales, customer service, and account teams need to know what’s changed — new navigation structure, updated service descriptions, new contact mechanisms. They’ll be receiving questions and should be able to navigate the site confidently.
✅ Phase 13: The First 90 Days Post-Launch
Run a 30-day SEO performance review. Compare organic traffic, ranking positions, and conversion rates against your pre-launch baseline. Identify any pages that have dropped significantly in visibility and investigate whether missed redirects, lost content, or technical issues are responsible.
Begin systematic content improvement. The redesign gives you a clean foundation. Now build on it. Identify the five pages on your new site with the most commercial importance and the weakest content — and improve them. Original data, expert perspective, direct answers to customer questions, clear calls to action.
Start building the review and content feedback loop. Install heatmaps and session recordings on your key landing pages. Review them monthly. What are users clicking that’s not a link? What are they ignoring that you expected them to engage with? Where are they dropping out of conversion flows? Let this data drive your ongoing optimisation.
Plan your first post-launch content initiative. A redesign often creates a surge of traffic and attention. Capitalise on it with a content initiative — a cornerstone piece of research, a campaign, a series of targeted articles — that gives new visitors a reason to return and gives your team something to promote.
The Most Expensive Mistakes We See Repeatedly
After managing enough redesigns to know the failure modes by heart, here are the patterns that cost businesses the most.
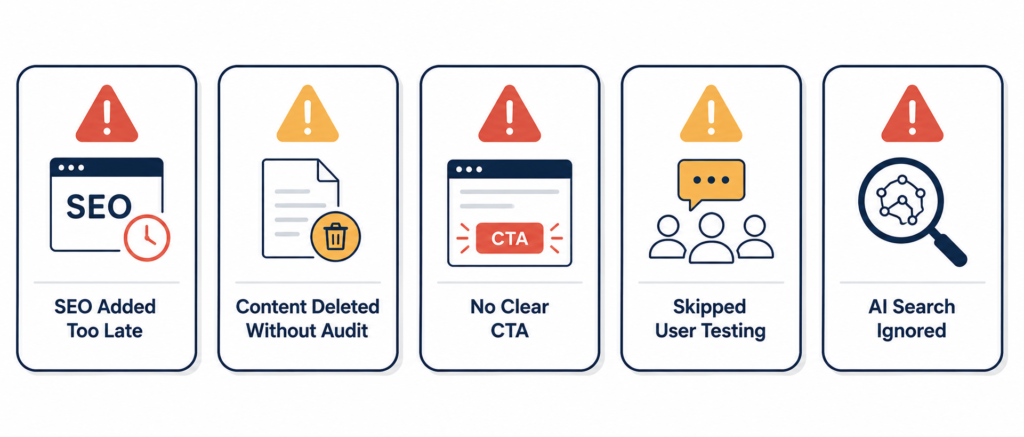
Treating SEO as a post-launch task. 63% of enterprise-level brands suffer a permanent 20% drop in organic traffic within the first 90 days of a launch — almost always because SEO wasn’t integrated into the planning and development phases. By the time the site is live, the architectural decisions that affect SEO are locked in.
Deleting content without checking its traffic value. We’ve seen businesses delete entire blog archives during redesigns because they “looked messy” on the new site — removing pages that were driving 20% of their total organic leads. Run the content audit. Know what you’re cutting before you cut it.
Prioritising visual novelty over conversion fundamentals. 70% of small business websites fail to include a clear CTA. A beautifully designed site with a buried or absent call to action will convert worse than a plain site with a clear one. Design in service of conversion always beats design in service of aesthetics.
Skipping user testing. Allocating 10% of a development budget to UX can result in an 83% increase in conversions. That’s a significant multiplier for a relatively modest investment. Running five usability tests with real users on your staging site before launch will reliably surface problems that months of internal review missed.
Not planning for AI search visibility. A site built in 2026 without consideration for how AI tools parse and cite content is already partially out of date. Websites must now perform for both human visitors and AI-powered search systems simultaneously — or risk losing visibility, trust, and conversions to competitors who do.
Real-World Scenarios: What Good and Bad Redesigns Look Like
The Redesign That Cost More Than It Should Have
A professional services firm briefed an agency on a full redesign. The brief was design-led: “modernise the look, improve the layout, make it feel more premium.” No content audit was commissioned. No SEO analysis was done before the build began.
The new site looked significantly better. It was also faster and more mobile-friendly. But the URL structure changed entirely — and only about 60% of the redirects were properly implemented. The firm lost 35% of its organic traffic in the first month. Several pages that had been driving a consistent stream of inbound enquiries for two years disappeared from Google’s index entirely.
Recovery took four months of remediation work that cost nearly as much as the original design budget. The lesson isn’t that redesigns are dangerous. It’s that skipping the audit phase always costs more than the audit would have.
The Redesign That Paid For Itself Quickly
A SaaS company planned their redesign as a six-month project with three distinct phases: strategy and audit, design and development, and optimisation. Before a single design was produced, they ran a full content and SEO audit, interviewed 12 existing customers, and documented their three primary conversion paths in detail.
The redesign retained 100% of high-value URLs. Redirects were mapped and tested exhaustively. Schema markup was implemented across all service pages and the blog. Mobile performance went from a 4.8-second LCP to 1.9 seconds.
Organic traffic held steady in the first month and grew 22% by month three. Conversion rate on the primary lead form increased 31%. The investment paid back within five months.
The difference wasn’t budget or talent — both companies worked with capable agencies. The difference was how the project was set up before the design work began.
Expert Observations from Agency Experience
A few things we’ve seen consistently that aren’t always covered in standard redesign guidance:
The sites that recover fastest from redesigns are the ones that never lost their content. The single most protective action you can take is refusing to delete any page that currently receives organic traffic without redirecting it correctly. This sounds obvious. It’s routinely ignored.
Mobile performance is now the primary performance metric. Mobile-first redesigns lift engagement by 74%. Designing for desktop first and “making it mobile-friendly” afterwards consistently produces inferior mobile experiences. Start with mobile. Expand outward.
Accessibility and AI readability are the same work. Clean semantic HTML, logical heading structure, descriptive alt text, clear labelling — these are WCAG requirements and AI citability signals simultaneously. Doing this work once serves both purposes.
The post-launch 90 days determine more than the launch itself. The businesses that compound the ROI from a redesign are the ones that treat launch as month one of an ongoing optimisation programme, not as the end of a project.
Future-Proofing Your Redesign for What’s Coming
A site launched in 2026 should be designed to remain performant for at least three to four years. Here’s what to build in now for what’s coming.
AI-native content structures will become more important, not less. The proportion of search interactions where AI tools synthesise the response rather than returning a list of links is growing. Content structured for AI citability — specific, direct, expert, schema-marked — will have compounding advantages.
Personalisation is becoming standard, not premium. Static landing pages are losing to AI-rendered variants that adapt copy, hero images, and CTAs to the visitor’s intent in real time. Build your site on a CMS and architecture that can accommodate personalisation features as they become accessible to businesses at your scale.
Core Web Vitals thresholds will tighten. Google has consistently moved performance expectations upward over time. Build your site to significantly exceed current thresholds — not merely meet them — so you have headroom when targets shift.
Voice and conversational search patterns are expanding. Content that answers questions naturally, in complete sentences, with clear context, performs better in voice search and AI-generated responses. Writing for how people speak, not just how they type, is increasingly important.
The Complete Redesign Checklist: Quick-Reference Summary
Phase 1 — Strategy
- Define measurable commercial objectives for the redesign
- Identify the specific problems to solve (not just “update the look”)
- Document the current buyer journey including AI search touchpoints
- Set baseline KPIs to measure against post-launch
- Crawl and document all current URLs, traffic, and backlinks
Phase 2 — SEO and Content Audit
- Identify top-performing pages by organic traffic and conversions
- Flag pages with high backlink value that must be preserved or redirected
- Identify thin, duplicate, or low-value content for consolidation or deletion
- Document all ranking keywords and their current page assignments
- Audit existing technical SEO health (errors, speed, mobile, crawlability)
Phase 3 — User Research
- Conduct user interviews with existing customers (minimum five)
- Review heatmaps and session recordings from the current site
- Analyse top three to five competitors’ sites for gaps and opportunities
- Map primary conversion journeys from current analytics data
Phase 4 — Information Architecture
- Build new site map based on user needs, not internal org structure
- Create user flow diagrams for all primary conversion paths
- Develop wireframes for all key page types before visual design begins
- Establish mobile-first design constraints before desktop layout
Phase 5 — Visual Design
- Define complete design system (typography, colour, spacing, components)
- Evaluate all designs against conversion objectives, not just aesthetics
- Confirm CTA placement above the fold on key pages
- Commission photography and video before development is complete
Phase 6 — Technical SEO (During Development)
- Build comprehensive 301 redirect map for all URL changes
- Block staging environment from search engine crawling
- Transfer or rewrite all metadata (titles, descriptions, H1s, alt text)
- Implement schema markup (Article, FAQ, Service, LocalBusiness, Author)
- Build deliberate internal linking structure for pillar pages
Phase 7 — Performance
- Optimise all images (WebP, compressed, explicit dimensions, lazy loading)
- Minimise render-blocking scripts and unnecessary CSS
- Implement CDN
- Target LCP under 2.5s, INP under 200ms, CLS under 0.1
- Test on real mobile devices at multiple screen sizes
Phase 8 — Accessibility
- Meet WCAG 2.2 AA as minimum standard
- Use semantic HTML throughout (logical heading hierarchy, landmark elements)
- Test with WAVE and Axe before launch
- Verify colour contrast, keyboard navigation, and form labelling
Phase 9 — GEO Optimisation
- Rewrite key pages to answer primary questions in the first 100 words
- Add FAQ sections with FAQPage schema to all major pages
- Add author schema and last-updated dates to all content
- Ensure consistent entity information across site and external sources
- Write a clear, AI-quotable business description for homepage and About page
Phase 10 — Pre-Launch Checks
- Test every 301 redirect individually
- Crawl staging site and compare against old site export
- Verify all tracking (GA4, GTM, conversion events, CRM integrations)
- Test all forms and confirm submissions route correctly
- Cross-browser and cross-device testing
- Confirm SSL certificate and HTTP→HTTPS redirect
- Verify robots.txt and XML sitemap configuration
- Check no staging URLs appear in the live site
Phase 11 — Analytics Configuration
- Configure GA4 conversion events before launch
- Verify Google Search Console and submit new sitemap
- Set up automated traffic anomaly alerts
- Build post-launch monitoring dashboard
Phase 12 — Launch Week
- Submit sitemaps to Google and Bing
- Request indexing for top 10 priority pages in Search Console
- Monitor for 404 errors daily for two weeks
- Re-crawl live site within 48 hours of launch
- Brief internal teams on new site structure and content
Phase 13 — 90-Day Post-Launch
- 30-day SEO performance review against pre-launch baseline
- Identify and investigate any significant ranking drops
- Begin systematic content improvement on key commercial pages
- Review heatmaps and session recordings from new site
- Plan and launch first post-launch content initiative
Conclusion: The Redesign That Earns Its Investment
A website redesign is not a design project. It’s a business transformation initiative that produces a new website as its deliverable.
The businesses that get the best return from their redesigns are the ones that treat it that way — with proper strategic groundwork, rigorous SEO protection, user research that drives structural decisions, and a post-launch programme that turns the new site into a compounding commercial asset.
The businesses that lose money on redesigns are the ones that brief for aesthetics, skip the audit phase, treat redirects as a development detail, and measure success by how good the site looks on the day it launches.
SEO and UX are ongoing efforts. Keep iterating based on real data — not assumptions. Your website is more than a digital brochure; it’s your most powerful marketing asset. When you follow a strategic website redesign checklist, you protect your investment and set the stage for real business growth.
Do the pre-work. Protect what’s working. Build for performance, accessibility, and AI readability from the start. And treat launch day as the beginning of the optimisation programme, not the end of the project.
About to begin a redesign or mid-project and concerned about your current trajectory? The highest-value conversation you can have right now is an honest audit of what you have, what you’re planning to change, and what the commercial risk of each change is. The checklist above gives you the framework. The detail is in the doing.
Frequently Asked Questions
Q: How long should a website redesign take? For a typical business website of 20–50 pages, a properly executed redesign takes three to six months from strategy kick-off to launch. Rushing this timeline is one of the most reliable ways to produce a site that looks better but performs worse. The phases that get compressed when timelines are tight — content audit, user research, QA — are almost always the ones that determine long-term commercial performance.
Q: How much does a website redesign cost? Surveys show redesign projects range from $3,000 to $75,000 depending on scope, complexity, platform, and whether you use an agency or freelancers. The cost variance is enormous because “website redesign” covers everything from a WordPress theme change to a full ground-up custom build. Define your objectives first — they’ll determine the scope, which determines the budget, far more reliably than any market rate.
Q: Will my redesign hurt my SEO rankings? It can — and does, significantly, for businesses that don’t plan properly. Many small businesses lose 30–60% of their organic traffic after a redesign because they focus on design but ignore search performance. Handled correctly, with a full content audit, comprehensive 301 redirect mapping, metadata transfer, and performance optimisation, a redesign should maintain or improve your search visibility.
Q: How do I know if my website needs a redesign versus incremental updates? Signs that a full redesign is warranted include: load times consistently above 3 seconds on mobile, site architecture that’s difficult to navigate or update, conversion rates significantly below industry benchmarks, a significant mismatch between how your brand presents itself and how your site looks, or technical debt that’s making routine updates expensive. If two or more of these apply, a redesign is likely more cost-effective than ongoing patch work.
Q: What’s the most important thing to do before a redesign? Run a full SEO and content audit. Know exactly which pages are generating organic traffic, which have valuable backlinks, and which keywords are currently driving qualified visitors to your site. This audit is the map that tells you what cannot be changed, what must be redirected, and what can be safely removed or restructured.
Q: How do I protect my SEO during a redesign? The four most critical actions: preserve high-performing URLs wherever possible, build a complete 1:1 redirect map for every URL that must change, transfer all metadata to the new site, and crawl both the staging and live versions to verify everything is in order before and after launch. Treat SEO as an integrated project stream running in parallel with design and development — not a task to address post-launch.
Q: What does GEO optimisation mean for a website redesign in 2026? GEO (Generative Engine Optimisation) is the practice of structuring your site so that AI search tools — ChatGPT, Perplexity, Google AI Overviews — can accurately understand, represent, and cite your business. In a redesign context, this means: writing content that answers questions directly, implementing FAQ schema on key pages, adding author schema and publication dates to content, using clear semantic heading structures, and ensuring your business entity information is consistent and credible across the web.
Q: Should I redesign my site in phases or all at once? For most businesses, a phased approach — starting with your highest-traffic and highest-converting sections, then working outward — reduces risk and allows you to learn from early performance data. A full “big bang” launch of an entirely new site creates a single high-risk moment. Phasing the rollout means any problems that emerge affect a smaller proportion of your traffic and are easier to isolate and fix.